Unit Testing in C#
Software developers, demographically, like to debate software development. Some of these debates rage endlessly over the years, while others careen toward at least some consensus. Unit testing, it seems, falls into this latter category.
Look at this Stack Overflow question that asks whether unit testing is worth the effort. The four most popular answers account for 1,348 votes and all offer some form of qualified or unqualified yes answer. Only the fifth most popular answer, with a microscopic 38 votes, offers a no. And it offers a qualified no at that. With Stack Overflow as a barometer, it appears that we have at least some consensus on this matter.
That’s certainly promising for the practice. But it doesn’t magically make everyone willing or able to do it. After all, the world has broad consensus that jogging and flossing are good ideas, but people opt not to do those things anyway.
As with jogging and flossing, time presents a barrier to adoption. You have to make time in your day to start doing something new. But unlike jogging and flossing, unit testing has a non-trivial learning curve. And, while I can’t easily help you find more time in your day, I can help you with the learning curve.
So let’s take a look today at unit testing in C#. I write this post assuming that you have no prior knowledge of the practice and come armed only with an interest in learning how it works.
Unit Testing in C#: The Value Proposition
Anyone contemplating doing something new should reasonably ask, “what’s in it for me?” In other words, before doing it, you should understand its value proposition for you. Why unit test?
Well, it does add a marketable skill to your resume. But let’s look beyond that. A blogger writing an entire post on this topic talked about confidence as the most important benefit. I tend to agree with this. Unit testing gives you confidence that your code does what you think it does. It also lets you make changes to codebases with more confidence than you otherwise might have.
How does it do this? Well, let’s consider how you approach testing your changes today. You make some changes to the code, and then you run the application to verify that your changes had the intended effect. You diligently test that the new behavior looks right, and you also make sure you haven’t broken anything. Then you commit and call it a day.
You have reasonably high confidence that your new changes are right. And you have some confidence that they didn’t introduce problems elsewhere. At least, you have that confidence today. In a week, month or year, who knows? That will depend on whether you or others on the team do any tinkering with what you just did.
But what if I told you that you could make “reasonably high” confidence in your changes and “some” confidence in the lack of regressions much, much higher? And what if I told you that you could keep that same, high level of confidence forever?
That is the value proposition of unit testing.
Unit Testing in C#: The Simplest Little Example
Alright, let’s assume my pitch sold you. At least, it sold you enough to keep reading. At this point, most people teaching you would start in with a formal definition of unit testing. I’m going to forgo that approach because I want to show you how conceptually easy it can be. Forget, for the moment, about unit test runners, test projects, and all that stuff that causes you to say, “maybe tomorrow.” Here’s unit testing in plain old C# that you know and love.
Let’s say that you wrote the following killer implementation.
| public class Calculator
{ public int Add(int x, int y) { return x + y; } } |
What would you do to test it? Assuming that this thing drove some kind of GUI, you might open up that GUI, input two numbers, and inspect the result. “Let’s see, I put in 15 and 20 and got back 35… seems right.”
But that involves a lot of manual effort. And it also doesn’t last beyond your manual testing effort. What if you wrote a program that automated verification? What if you did something like this?
| static void Main(string[] args)
{ var calculator = new Calculator();
if (calculator.Add(15, 20) != 35) throw new InvalidOperationException(); } |
You could achieve this quite simply. In the same solution as your Calculator class, you create a new console project with a reference to your code. Write this code in Main, and now you can run it anytime you like. If it exits without issue, all looks good. If you run this and get an exception, you know someone has messed with the Add() method and broken it somehow.
Unit Testing in C# The Right Way
Yes, automated unit testing really is this conceptually simple. And this shows you the origin of the practice. Developers realized that they could automate verification of their code. Shortly thereafter, being developers, they then started building all sorts of frameworks for this. Let’s look now at how and why they did that because that will get you up to speed with how unit tests work when implemented in the standard fashion.
Think of the Main code above. What happens when you want to add more test cases? You keep cramming more and more code into that method, and so it gets disorganized. Maybe you pull the checks out into their own methods, but you still have the trouble of understanding what failed and why when you run it. And, how are you going to do all of the fancy things that people do, like integrate this with your build.
That’s where the established tooling comes in. It worries about this so that you don’t have to. That’s really all that separates standard unit test technology from the simple concept I showed you above. That’s what frameworks and test runners get you.
Implementing a Simple Unit Test
To keep things as simple as possible, let’s stay completely within Visual Studio. You have your Calculator class, but you want to test it. And you want to test it properly, without adding your own homegrown test running scheme.
You can follow this detailed explanation to do so. But if you want the short version, you create a new Unit Test project in your solution, as shown here.
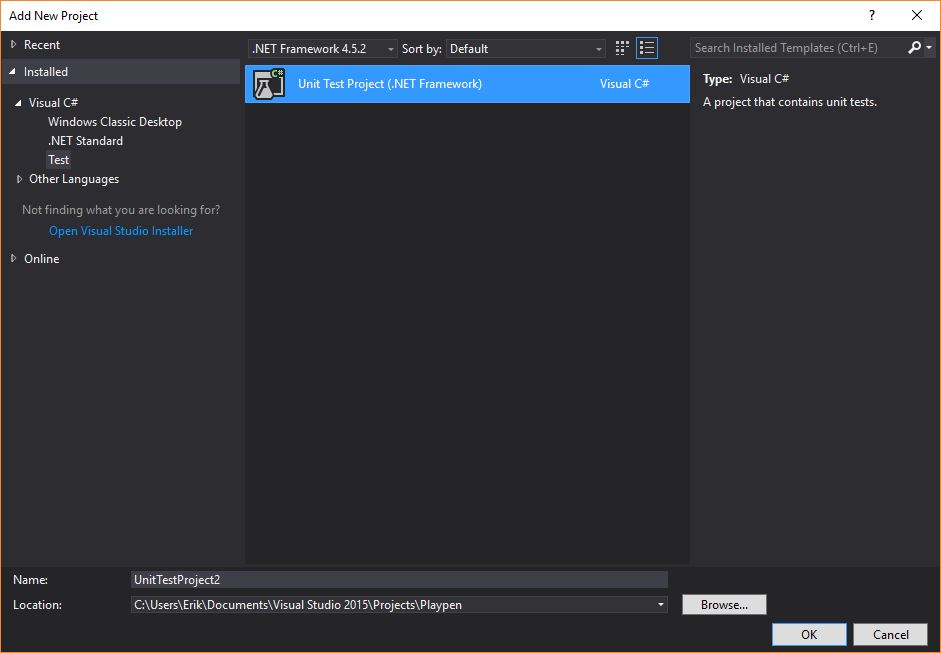
Conventionally speaking, you can name it Production.Tests, where Production represents the name of the project you’re testing. You’ll usually want a unit test project for each production code project.
Once you do that, you’ll have a new project in your editor with a single file, containing the following code.
| [TestClass]
public class UnitTest1 { [TestMethod] public void TestMethod1() { } } |
Let’s change that a little bit, both for the sake of good naming and for doing something useful. But, before doing that, make sure to add a reference in this test project to your production project so that you can instantiate the Calculator class. Take a look at the new code.
| [TestClass]
public class CalculatorTests { [TestMethod] public void Adding_10_And_15_Returns_25() { var calculator = new Calculator();
int result = calculator.Add(10, 15);
Assert.AreEqual<int>(25, result); } } |
You’ll notice that you no longer throw exceptions to indicate failure. Instead, you invoke this Assert method, and you do so within the designations of [TestClass] and [TestMethod]. To make all of this work, just go the menu and do Test-Run->All (keyboard shortcut “Ctrl+R, A”). This triggers a test explorer window to appear and show you the test run, which will involve a single passing test. If you change the first parameter to Assert.AreEqual(), you’ll see it fail.
What’s Going on Here?
Okay, so you’ve successfully moved from something you fully understand to something a little more magical. Let’s now unpack that a little to demystify.
When you create a unit test project, Visual Studio inherently understands some things about it. The TestClass and TestMethod attributes provide it with contextual clues by convention. These things say, “hey, test runner, take notice of this class and method!”
The test runner is a special way of executing the project that Visual Studio brings to bear. It says, “I will execute this project by looking for everything labeled TestMethod and executing the code in it. I will interpret exceptions and failed asserts as failures and everything else as passes.” And, really, at the core of things, that’s it.
Looking at it through this lens, you can understand how it’s really just a more sophisticated version of our earlier implementation in Main. But now you get a bunch of conventions that the developer community understands, and you can integrate with all sorts of build tools and others besides.
This Is Just the Beginning
Hopefully you now have an understanding of Unit Testing in C# from first principles. The core premise is truly both simple and powerful. Don’t let all of the technologies and experiences layered on top of it distract you from that.
But, at the same time, understand that the world has learned a lot about unit testing in the decades since its introduction and automation. While you now understand the fundamentals, you have a lot of learning and practicing left to do. And there’s no better time to start than now.