Azure DevOps Tutorial: Agile Project Management
Azure DevOps is a suite of related tools that allows software teams to track work, manage code, run builds, deploy applications, and manage tests. It’s a centralized, complete, and seamlessly integrated set of tools that can be used for nearly any software project. It’s been known by other names in the past, such as Visual Studio Online (VSO) or Visual Studio Team Services (VSTS), and is the evolution of Team Foundation Server (TFS).
As you can see from the Azure DevOps product page, it can be a bit daunting at first. Not to worry, this post will prep you with some 101-level info so you know just where to start.
While it doesn’t have the features you’d find in a full project management suite, project managers, product managers, and business analysts alike should be ready to use the features in this post. With that, let’s gear up and get into the waters of Azure DevOps.
Azure DevOps Features
We can classify the features of Azure DevOps according to people, processes, and tools. Using this map as our guide, we can look at the security features, process management features, and tools for information sharing. These are the main features used for Azure DevOps project management.
People
People are the heart of any organization. Azure DevOps fits with workgroups, teams, or traditional management approaches. You can link up to your Azure Active Directory (AD), sync with an on-prem AD, or even invite guests to work in your instance. All users are subject to access control, so you can control what they see and what they don’t. Finally, users are added to teams where they can view work, access code, and collaborate with others.
Users
Users are added to Azure DevOps by an administrator. Once added, a user can set up their profile by adding their picture and some other info about themselves.
Azure AD/Guests
A typical user is added to your Azure AD. However, you can invite guests from other organizations to join you in your work. This is perfect when you have a consultant working on a project or you need to share work with outside resources. Simply enter the person’s email address when you add the user and select a team.
Once the outside user has been invited, they’ll receive a nice email with an introduction and links to the project.
Groups/Permissions
Groups are the primary access control mechanism in Azure DevOps. There are several built-in groups that give users access to various features. Access levels are covered in depth in the documentation, but it’s fairly simple to set up a group and add users or even other groups. The organization settings page has group management for the organization. Simply add members to the appropriate group following the principle of least privilege.
Also, the project settings page has a place for setting permissions on a group for the project itself. When you have multiple projects, you can set different levels of access to each. This way, a single user or group can have different levels of access to different projects as needed.
Teams
Users can be put into one or more teams. This is often how the real world works and teams limit the scope of what the user can see when they have a specific team selected. An example should clarify this concept.
Let’s say Junah is a developer working on Project X and gets pulled into Project Y for a bit as well. Junah is on Team Project X, so she can see everything a developer can see in Project X but nothing in Project Y just yet. An admin will need to add Junah to Team Project Y so she can access the resources for that project.
Here’s what you can expect to see when you manage a team:
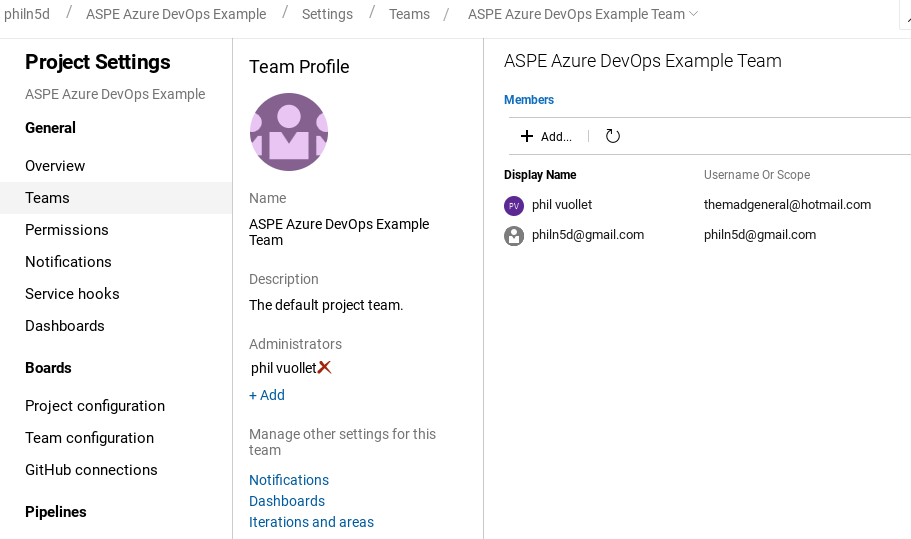
This team has two users, one of which has been assigned as an administrator. As you can see from the links at the bottom, teams can be scoped narrower than the project. A team might be scoped to a portfolio, a project, an area, or an iteration. A test team might only see bugs, stories, and tasks on the Azure board. A program manager may be on a portfolio team where they can only see epics and features without being bombarded with details.
Processes
Development work processes vary greatly across organizations so Azure DevOps has a few general templates for Azure boards. These are customizable, but with customization comes additional complexity. In order to keep your process flowing smoothly, you can set up your backlogs and work item fields according to the needs of your organization or project.
Process Types
The four built-in process types for boards, from simple to complex, are basic, agile, scrum, and CMMI. They generally give you the most common fields and structures you need to manage work within various process types. From there, you can create an “inherited” process type. An inherited process type is your own process definition where you can add fields and name it whatever you like. Process types apply to the project, but teams can have their own boards in order to view the work in different ways. For example, developer teams may only need to see their work while a manager will need to see the work of all their subordinates.
Backlogs
Backlogs are where you manage the work items. They’re for product and feature planning as well as work organization.
Backlogs can be divided into levels according to your needs. The types of issues mapped to each backlog depend on the process type selected. The three main types of backlogs are as follows:
- Portfolio backlog: higher-level backlog of epics and features
- Requirement backlog: more detailed backlog with issues, product backlog items, or user stories
- Iteration backlog: task-level backlog for each time-scoped iteration
Which backlog other types—such as bugs and impediments—show depends on the team’s setting.
Projects
Projects are basically containers for managing work. Sometimes, it makes sense to map products to projects, and other times it makes sense to make a project for a specific work project. It all depends on the scope of what you’re setting out to accomplish.
Boards
Boards are for organizing and managing the work. Work items are cards on a board that are divided into columns. The columns represent the status of the work items contained within. You move cards from left to right on the board as the work gets completed.
Iterations
Iterations are used for planning. While Azure DevOps can forecast the work automatically, it’s difficult to capture every work item upfront in a meaningful and accurate way. This potentially makes forecasting inaccurate.
Scrum attempts to solve this problem by using a sprint planning cycle. In scrum, you would only plan the work for the next two weeks, pulling in work from the backlog, and learn how much you can do in an iteration as you go.
On the other hand, a Kanban approach uses a continuous pull without any specific planning cycles. Although releases don’t have to fall into an iteration, it may still be helpful to use them solely as planning cycles.
Areas
You can use areas to split work up logically, match it to functional areas, or even create areas for various lines of business, such as financial, risk management, human resources, etc. Within a larger project, areas really come in handy to make the work and boards more manageable. See, even the boards and teams can be mapped to specific areas. So you might have a security area with a team of security engineers, while a metrics area might be used by a data science team.
Tools
There are many tools in Azure DevOps. Some are for building and deploying code. Other tools are for source code management. The following tools are useful for project management.
Notifications
Members of your organization can be notified or opted out of notifications for nearly any action in Azure DevOps. The major reasons for notifications are work assignment and build success/failure. Often, stakeholders want to be notified when a new build has been deployed. This is possible even when the stakeholders don’t have full access to the project. Notifications can be overwhelming if there’s a lot of activity in a project, so it’s best to keep them appropriately scoped.
Dashboards
Create dashboards for different purposes. One style of dashboard for developers might have links to their work items and to the code. A dashboard for a test engineer might have test coverage and results widgets. You could have a dashboard for a project manager that shows the overall progress of the project or iteration.
Analytics
Azure DevOps has several types of built-in analytics reports. It has control charts, cumulative flow diagrams, and burn charts to help understand workflow patterns. There are charts for pipelines and build health. And it has charts for testing concerns. Charts can be added to dashboards or viewed individually from the related Azure Boards feature.
You can use these data displays to get a broad perspective on a portfolio of projects. Or you can filter the data coming into the graphs and charts to narrow in on specific aspects. There’s also a chart builder that you can use to create something more custom using queries.
Wiki
There is a wiki that can be used for notes, requirements, and documentation. Often, this is where information stagnates, but wikis can really be helpful if there is a practice of participation and shared ownership. Teams may face challenges organizing wikis and often end up with outdated or repeated information. However, a well-maintained wiki can serve as a useful information resource, especially for historical context.
How Does All This Fit Together?
So, you set up one or more projects. Create teams. Add people (users) to teams. Those users are put into groups that give them permission to do certain things like update code, approve builds, alter deployment processes, or create and run tests.
A project uses a process template that defines how the work items are organized. They can be put into areas on one dimension and iterations in another. Areas are for slicing the application up and dividing the work logically. Iterations are for planning purposes. They’re used to define when something will be worked on.
In general, once a work item is complete, a developer with commit their code. This can trigger a build which simply means that the latest code will be compiled or otherwise prepared for deployment. It can be deployed manually or automatically to one or more environments. The pipeline can run tests automatically and/or testers can run manual tests before moving the build to the next stage. Pipelines are fully configurable and can include any number of manual approval steps or can be fully automated depending on how your organization operates.
What About Pitfalls?
In a large organization, teams might want to use their own fields and project structures. This is possible, but it can get confusing if there is too much customization. It’s often best to begin simply and consider the trade-offs before adding anything additional to the process.
It’s easy to see metrics in reports, but it’s quite another to properly track the work using work items. Again, the main indication of progress is working software rather than progress bars on a dashboard. While these things work well in theory, the reality is usually much different than we’d like.
How Can You Learn More?
We’ve reviewed a lot of things here, ranging from the people, processes, and tools of Azure DevOps to the potential downsides you may encounter. But there’s, even more, to be gained if you supplement your learning with articles about enterprise DevOps strategy or if you read about why we’re often pretty bad at managing software projects. You can even take a whole course on Azure DevOps. The end results of your understanding will speak for themselves.
Azure DevOps for Agile at Scale
View Course